Contents
Hello there my fellow dev, welcome to this blog. In this blog tutorial, I will teach you to create Qr Codes in CodeIgniter 4. This tutorial teaches you the step-by-step procedure in order for the reader to easily understand.
What is a QR Code? QR stands for Quick Response. A Qr Code is a type of barcode that is a machine-readable optical label that contains information about the item to which it is attached. Qr Code may contain a locator, identifier, or a link to a website and etc. QR Code is one of the most used types of two-dimensional code.
We will be using CodeIgniter 4 on this tutorial. CodeIgniter is one of the most powerful PHP frameworks. It is an open-source web framework that is used for rapid web development. It is popular for its exceptional performance, small footprint, requires nearly zero configuration, thorough documentation, and many more. If you want to learn more about CodeIgniter just visit their documentation here.
Before we proceed, please add an image in this directory “public/img/logo.png”, it will be used for inserting images on QR codes.
Tutorial Video:
Step 1: Install CodeIgniter 4
For us to install CodeIgniter 4 we can install via composer or directly download CodeIgniter 4 here:
Install via composer:
composer create-project codeigniter4/appstarter ci-4-qr-code-generator
Step 2: Change CodeIgniter Environment
The default environment of CodeIgniter is production, it is a safety feature to add security in case settings are messed up when it goes live. For us to change the environment we will rename or copy the file env to .env. Once it is renamed, open the file and uncomment and change the CI_ENVIRONMENT value from production to development.
.env
CI_ENVIRONMENT = development
Step 3: Install Simple QrCode Package
We will then install this package simplesoftwareio/simple-qrcode, this package will be used for generating QR Codes.
composer require simplesoftwareio/simple-qrcode
Once done installing the package, we are set to go in generating QR codes.
You can read the more detailed documentation of simple-qrcode package by clicking this link.
Step 4: Create A View
View files are web pages or fragments of a page like a header or a footer and etc. Views can be embedded in other views whenever you need a hierarchy on view files.
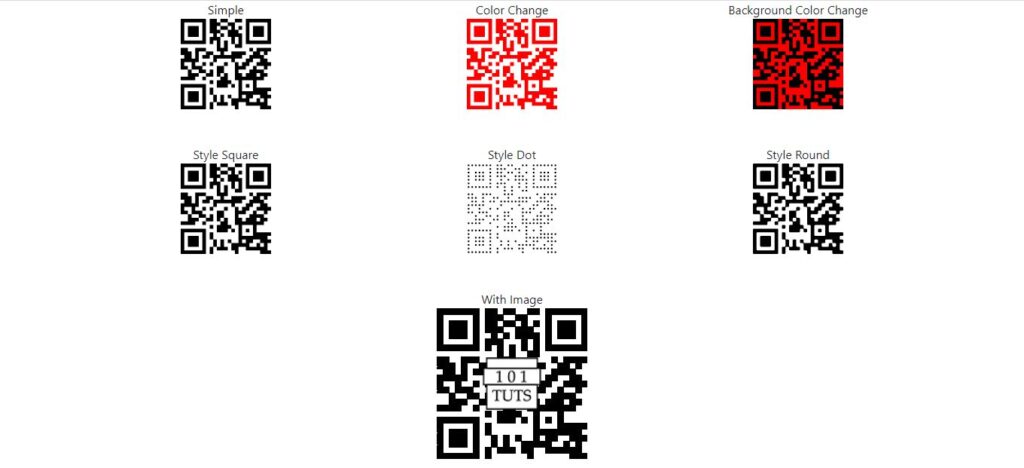
Create this view file “app/Views/qr-codes.php” and insert these codes:
app/Views/qr-codes.php
<!doctype html>
<html lang="en">
  <head>
    <meta charset="utf-8">
    <meta name="viewport" content="width=device-width, initial-scale=1">
    <title>Qr Code</title>
    <link href="https://cdn.jsdelivr.net/npm/bootstrap@5.2.2/dist/css/bootstrap.min.css" rel="stylesheet" integrity="sha384-Zenh87qX5JnK2Jl0vWa8Ck2rdkQ2Bzep5IDxbcnCeuOxjzrPF/et3URy9Bv1WTRi" crossorigin="anonymous">
  </head>
  <body>
    <div class="container text-center">
        <div class="row">
            <div class="col">
                <p class="mb-0">Simple</p>
                <?php echo $simple ?>
            </div>
            <div class="col">
                <p class="mb-0">Color Change</p>
                <?php echo $changeColor ?>
            </div>
            <div class="col">
                <p class="mb-0">Background Color Change </p>
                <?php echo $changeBgColor ?>
            </div>
        </div>
        <div class="row mt-5">
            <div class="col">
                <p class="mb-0">Style Square</p>
                <?php echo $styleSquare ?>
            </div>
            <div class="col">
                <p class="mb-0">Style Dot</p>
                <?php echo $styleDot ?>
            </div>
            <div class="col">
                <p class="mb-0">Style Round</p>
                <?php echo $styleRound ?>
            </div>
        </div>
        <div class="row mt-5">
            <div class="col">
                <p class="mb-0">With Image</p>
                <img src="data:image/png;base64, <?php echo base64_encode($withImage) ?>"/>
            </div>
        </div>
    </div>
    <script src="https://cdn.jsdelivr.net/npm/bootstrap@5.2.2/dist/js/bootstrap.bundle.min.js" integrity="sha384-OERcA2EqjJCMA+/3y+gxIOqMEjwtxJY7qPCqsdltbNJuaOe923+mo//f6V8Qbsw3" crossorigin="anonymous"></script>
  </body>
</html>
Step 5: Create A Controller
Run this command to create a controller:
php spark make:controller QrCodeGeneratorController
After creating a controller, add these lines of codes to the app\Controllers\QrCodeGeneratorController.php file:
app\Controllers\QrCodeGeneratorController.php
<?php

namespace App\Controllers;

use App\Controllers\BaseController;
use SimpleSoftwareIO\QrCode\Generator;

class QrCodeGeneratorController extends BaseController
{
    public function index()
    {
        $qrcode = new Generator;
        $qrCodes = [];
        $qrCodes['simple'] = $qrcode->size(120)->generate('https://www.binaryboxtuts.com/');
        $qrCodes['changeColor'] = $qrcode->size(120)->color(255, 0, 0)->generate('https://www.binaryboxtuts.com/');
        $qrCodes['changeBgColor'] = $qrcode->size(120)->color(0, 0, 0)->backgroundColor(255, 0, 0)->generate('https://www.binaryboxtuts.com/');

        $qrCodes['styleDot'] = $qrcode->size(120)->color(0, 0, 0)->backgroundColor(255, 255, 255)->style('dot')->generate('https://www.binaryboxtuts.com/');
        $qrCodes['styleSquare'] = $qrcode->size(120)->color(0, 0, 0)->backgroundColor(255, 255, 255)->style('square')->generate('https://www.binaryboxtuts.com/');
        $qrCodes['styleRound'] = $qrcode->size(120)->color(0, 0, 0)->backgroundColor(255, 255, 255)->style('round')->generate('https://www.binaryboxtuts.com/');

        $qrCodes['withImage'] = $qrcode->size(200)->format('png')->merge('img/logo.png', .4)->generate('https://www.binaryboxtuts.com/');
            return view('qr-codes', $qrCodes);
    }
}
Step 5: Register Route
After creating a controller, register this route.
app/Config/Routes.php
$routes->get('/qr-codes', 'QrCodeGeneratorController::index');
Step 6: Run the Application
Now that we have completed the steps above we will now run the app. To run the app, execute this command:
php spark serve
After successfully running your app, open this URL in your browser:
http://localhost:8080/qr-codes
Screenshots:
QR Codes


