Contents
- What is the MERN stack?
- Preview:
- Backend Development
- Prerequisite:
- File Structure Preview:
- Step 1:Initialize Node.js project
- Step 2: Install Packages
- Step 3: Setup Express Application
- Step 4: Update package.json
- Step 5: Setup Environment Variables
- Step 6: Create A Model
- Step 7: Create A Controller
- Step 8: Create A Route
- Step 9: Start the Express App
- Test the API:
- Front End Development
What is the MERN stack?
The MERN stack is a popular set of technologies used for building full-stack web applications. It is an acronym that stands for MongoDB, Express.js, React, and Node.js. Each of these components plays a crucial role in the development process:
- MongoDB: A NoSQL database that stores data in a flexible, JSON-like format. MongoDB is known for its scalability, high performance, and ease of use. It’s particularly well-suited for applications with large amounts of data or those that require flexible schemas.
- Express.js: A minimalist web application framework for Node.js. Express.js provides a simple yet powerful set of features for building web applications and APIs. It’s designed to be unopinionated, meaning it allows developers to structure their applications in various ways based on their preferences and requirements.
- React: A JavaScript library developed by Facebook for building user interfaces. React is component-based, meaning it allows developers to create reusable UI components that encapsulate their own state and behavior. It’s particularly well-suited for building single-page applications (SPAs) and dynamic user interfaces.
- Node.js: A JavaScript runtime environment that allows developers to run JavaScript code on the server-side. Node.js is built on the V8 JavaScript engine and provides a non-blocking, event-driven architecture that makes it highly efficient for handling concurrent requests.
How They Work Together:
- MongoDB serves as the database where data is stored and retrieved.
- Express.js operates on the backend, handling requests and responses, and interacting with the database.
- React handles the frontend, creating a dynamic and responsive user interface.
- Node.js provides the runtime environment for running the server-side code.
When combined, MongoDB, Express.js, React, and Node.js provide a comprehensive solution for building modern web applications. MongoDB serves as the database layer, Express.js handles server-side logic and routing, React manages the client-side user interface, and Node.js powers the server-side runtime environment. This stack offers a cohesive and efficient development experience, allowing developers to leverage JavaScript across the entire application stack, from front-end to back-end.
Preview:
Backend Development
We will now develop our backend.
Prerequisite:
- MongoDB
- Node (This tutorial uses 18.20.2)
File Structure Preview:

Step 1:Initialize Node.js project
Create a folder named mern-backend, go into the newly created folder and open your terminal or cmd, and run this command:
npm init -y
Running npm init -y initializes a new Node.js project in the current directory using default values for package.json fields, without requiring user input. The -y flag stands for “yes,” which means it automatically accepts all defaults. This command is useful for quickly setting up a new project without having to manually enter information for each field in the package.json file.
Step 2: Install Packages
After initializing a node.js project, let’s install the packages that we will be using:
npm install express
npm install dotenv
npm install cors
npm install mongoose
- express – Express.js is a minimal and flexible Node.js web application framework that provides a robust set of features for building web applications and APIs. It is designed to make the process of creating server-side applications in Node.js simpler and more efficient.
- dotenv – is a popular npm package that loads environment variables from a .env file into process.env, making it easy to manage configuration settings in Node.js applications.
- cors – CORS (Cross-Origin Resource Sharing) middleware package in a Node.js project. CORS is a security feature implemented by web browsers to prevent unauthorized access to resources hosted on a different origin (domain, protocol, or port) than the one making the request.
- mongoose – Mongoose is an Object Data Modeling (ODM) library for MongoDB and Node.js, designed to work in an asynchronous environment. It provides a straightforward schema-based solution to model your application data and handle interactions with a MongoDB database.
Then let’s install the nodemon package, if you have already installed nodemon you can skip this.
- nodemon – is a utility that monitors changes in your Node.js application files and automatically restarts the server whenever a change is detected. This eliminates the need to manually stop and restart the server every time you make changes to your code, making the development process more efficient and productive. Nodemon is particularly useful during the development phase of a Node.js application when you frequently make changes to your code and want to see the changes reflected immediately without having to restart the server manually.
npm install -g nodemon
Running npm install -g nodemon installs the Nodemon package globally on your system. The -g flag stands for “global,” which means Nodemon will be installed in a location accessible system-wide, rather than being installed locally in a specific project directory.
Step 3: Setup Express Application
Create a file inside our root folder, name the file server.js, and add these lines of codes:
server.js
require('dotenv').config()

const express = require('express')
const mongoose = require('mongoose')
const cors = require('cors')
const projectRoutes = require('./routes/projectApi')

// express app
const app = express()

// middleware
app.use(express.json())
app.use(cors())
app.use((req, res, next) => {
  console.log(req.path, req.method)
  next()
})

// routes
app.use('/api/projects', projectRoutes)

// connect to mongodb
mongoose.connect(process.env.MONGO_URI)
.then(() => {
    console.log('connected to database')
    // listen to port
    app.listen(process.env.PORT, () => {
        console.log('listening for requests on port', process.env.PORT)
    })
})
.catch((err) => {
    console.log(err)
})
In an Express.js application, the entry point is typically the main file where you initialize the Express server and define its configurations, routes, and middleware. This main file is commonly named server.js or app.js, but it can be named anything you prefer.
The entry point file is where you set up your Express application by importing the necessary modules, creating an instance of Express, defining routes, applying middleware, and starting the server. It’s the starting point of your application’s execution.
Step 4: Update package.json
Add this line on the scripts field “dev”: “nodemon server.js”. The scripts field defines a set of commands that can be executed via npm. These scripts provide shortcuts for common development tasks, such as starting the server, running tests, building the project, etc.
package.json
{
  "name": "express-api",
  "version": "1.0.0",
  "description": "",
  "main": "index.js",
  "scripts": {
    "test": "echo \"Error: no test specified\" && exit 1",
    "dev": "nodemon server.js"
  },
  "keywords": [],
  "author": "",
  "license": "ISC",
  "dependencies": {
    "cors": "^2.8.5",
    "dotenv": "^16.4.5",
    "express": "^4.19.2",
    "mongoose": "^8.3.2"
  }
}
Step 5: Setup Environment Variables
Create a .env file, and add the environment variables.
.env
PORT=4000
MONGO_URI=mongodb://127.0.0.1:27017/express_rest_api
- PORT – port number on which the server should listen for incoming HTTP requests
- MONGO_URI – refers to the Uniform Resource Identifier (URI) used to connect to a MongoDB database. It contains information such as the protocol, hostname, port, database name, and optionally authentication credentials.
You can get the url when you open the MongoDBCompass:

Note: if an error occurs when connecting to db when we start our app. Change the localhost to 127.0.0.1
Sample .env
PORT=4000
MONGO_URI=mongodb://127.0.0.1:27017/express_rest_api
Step 6: Create A Model
Create a folder named models inside our root folder, and inside it create a file named projectModel.js and add these lines of code.
models\projectModel.js
const mongoose = require('mongoose')

const Schema = mongoose.Schema

const projectSchema = new Schema({
  name: {
    type: String,
    required: true
  },
  description: {
    type: String,
    required: true
  },

}, { timestamps: true })

module.exports = mongoose.model('project', projectSchema)
Step 7: Create A Controller
Create a folder named controllers inside our root folder, and inside it create a file named projectController.js and add these lines of code.
controllers\projectController.js
const Project = require('../models/projectModel')
const mongoose = require('mongoose')

// get list of projects
const getProjects = async (req, res) => {
  const projects = await Project.find({}).sort({createdAt: -1})

  res.status(200).json(projects)
}

// create a new project
const createProject = async (req, res) => {
    const {name, description} = req.body

    // add to the database
    try {
      const project = await Project.create({ name, description })
      res.status(200).json(project)
    } catch (error) {
      res.status(400).json({ error: error.message })
    }
  }

// get specific project
const getProject = async (req, res) => {
  const { id } = req.params

  if (!mongoose.Types.ObjectId.isValid(id)) {
    return res.status(404).json({error: 'No project found for id ' + id})
  }

  const project = await Project.findById(id)

  if (!project) {
    return res.status(404).json({error: 'No project found for id ' + id})
  }

  res.status(200).json(project)
}

// update a project
const updateProject = async (req, res) => {
    const { id } = req.params
    const {name, description} = req.body
    if (!mongoose.Types.ObjectId.isValid(id)) {
        return res.status(404).json({error: 'No project found for id ' + id})
    }

    const project = await Project.findOneAndUpdate({_id: id}, {name, description}, {returnOriginal: false})

    if (!project) {
      return res.status(404).json({error: 'No project found for id ' + id})
    }

    res.status(200).json(project)
}

// delete a project
const deleteProject = async (req, res) => {
    const { id } = req.params

    if (!mongoose.Types.ObjectId.isValid(id)) {
      return res.status(404).json({error: 'No project found for id ' + id})
    }

    const project = await Project.findOneAndDelete({_id: id})

    if(!project) {
      return res.status(404).json({error: 'No project found for id ' + id})
    }

    res.status(200).json({message: 'Project deleted.'})
  }


module.exports = {
  getProjects,
  createProject,
  getProject,
  updateProject,
  deleteProject
}
Step 8: Create A Route
Create a folder named routes inside our root folder, and inside it create a file named projectApi.js and add these lines of code.
routes\projectApi.js
const express = require('express')
const {
    getProjects,
    createProject,
    getProject,
    updateProject,
    deleteProject
} = require('../controllers/projectController')


const router = express.Router()

// get list of projects
router.get('/', getProjects)

// create a new project
router.post('/', createProject)

// get specific project
router.get('/:id', getProject)

// update a project
router.patch('/:id', updateProject)

// delete a project
router.delete('/:id', deleteProject)


module.exports = router
Step 9: Start the Express App
Run this command to start the Express App:
npm run dev
After successfully running your app, the base url of our app will be:
http://localhost:4000
Test the API:
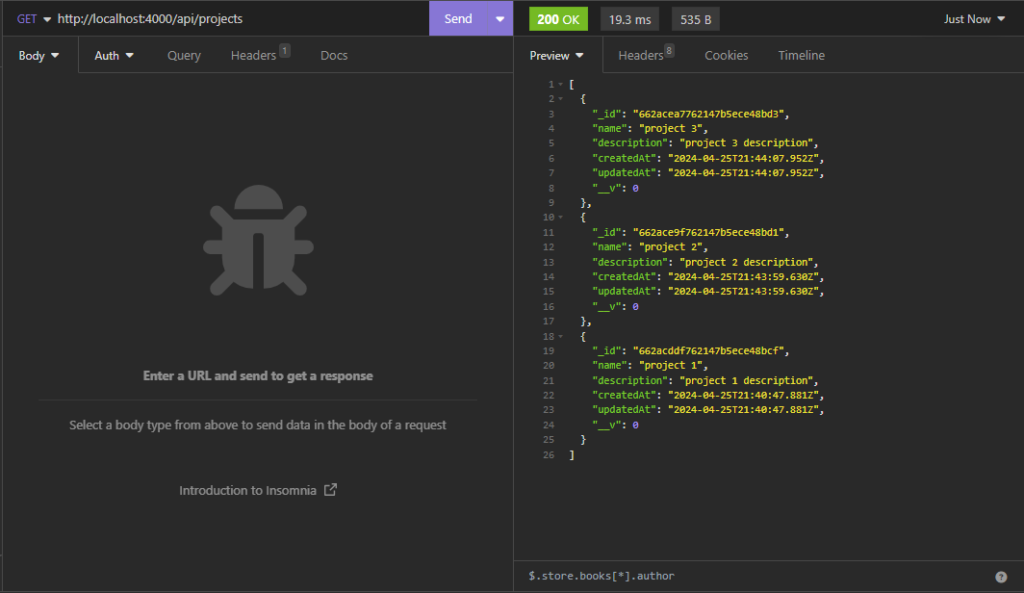
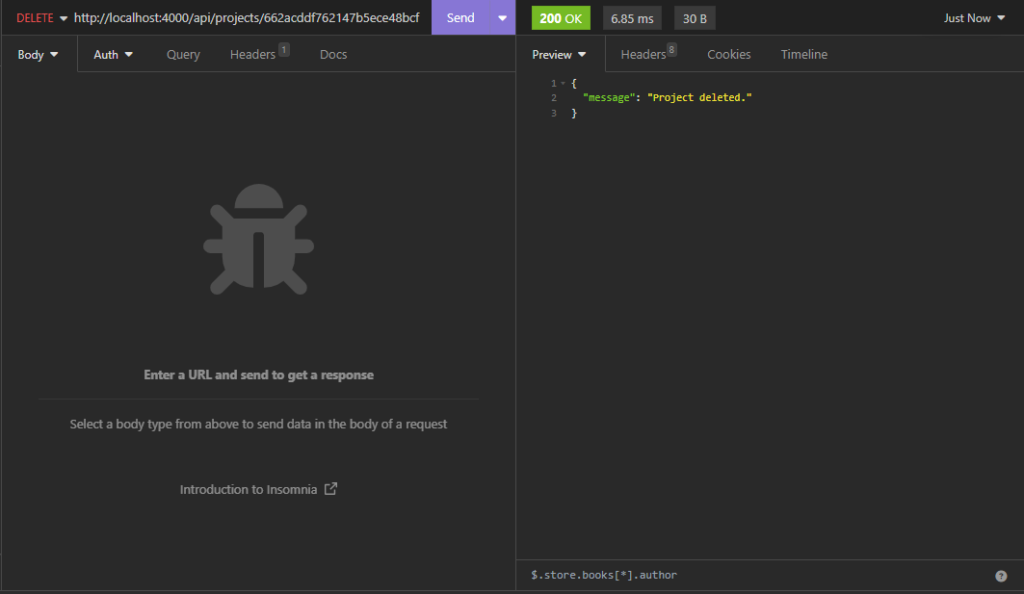
We will be using Insomia for testing our API, but you can use your preferred tool.
POST Request – This request will create a new resource.

GET Request – This request will retrieve all the resources.
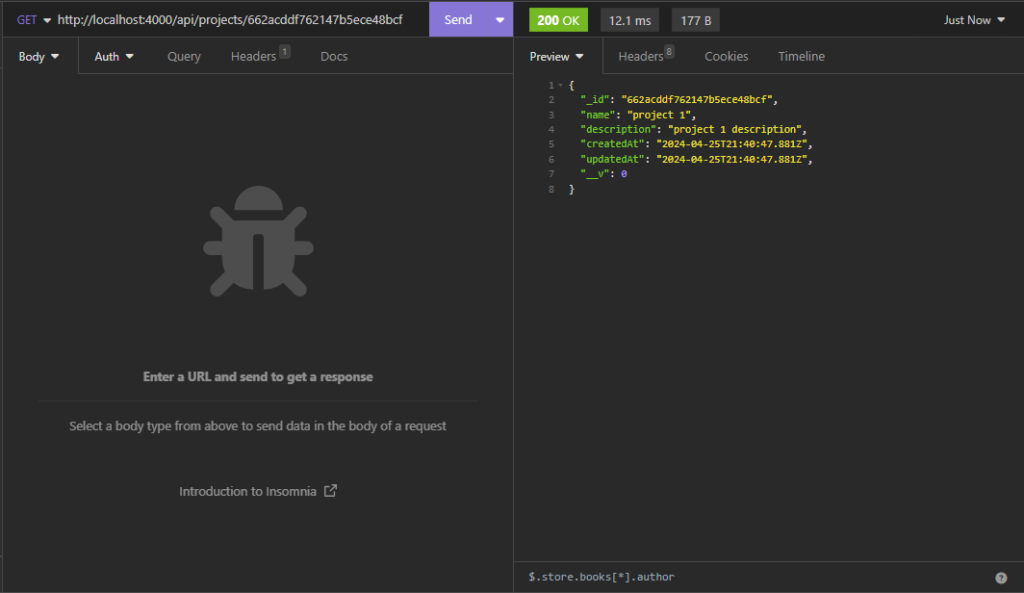
GET Request (with id) – This request will retrieve a particular resource.
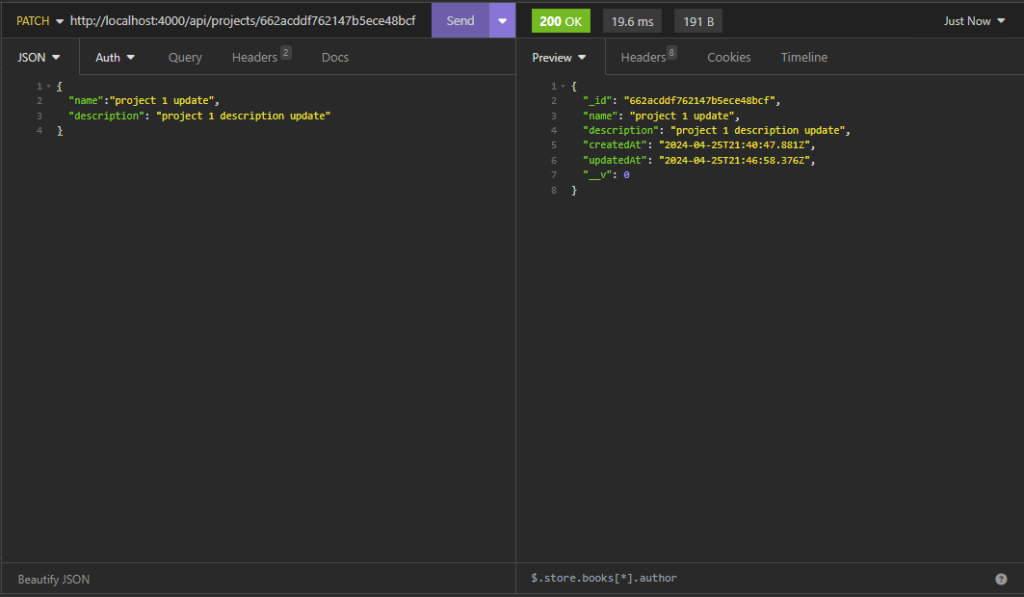
PATCH Request – This request will update a resource.
DELETE Request – This request will delete a resource.
Front End Development
We will now develop our frontend.
Prerequisite:
- npm
- node (This tutorial uses 18.20.2)
- npx
Step 1: Create A React App
First, select a folder that you want the React App to be created then execute this command on Terminal or CMD to create the React App:
npx create-react-app mern-frontend
Step 2: Install packages
After creating a fresh react project, go to the react project folder and install these packages:
- react-router-dom – a package used for client-side routing that allows the app to change the URL without making another request for a document from the server but instead it will immediately render the new UI or new information.
- bootstrap – a package of bootstrap framework
- sweetalert2 -a package for pop-up boxes
- axios – a promised-based HTTP library that is used to request to a server or API.
npm i bootstrap
npm i react-router-dom
npm i sweetalert2
npm i axios
Step 3: Create .env
After installing the packages, we will create our .env file in our root directory. We will declare the API base URL in the .env file. Don’t forget to add it to the .gitignore file. The REACT_APP_API_URL is the URL of our express app.
REACT_APP_API_URL="http://localhost:4000/"
Step 4: Routing and Components
We will now create the component, refer to the image below for the file structure.

You can create your own file structure but for this tutorial just follow along.
Let’s update the App.js file – We will add the routes here:
src/App.js
import React from 'react'
import { BrowserRouter as Router, Routes, Route } from "react-router-dom"
import ProjectList from "./pages/ProjectList"
import ProjectCreate from "./pages/ProjectCreate"
import ProjectEdit from "./pages/ProjectEdit"
import ProjectShow from "./pages/ProjectShow"

function App() {
  return (
    <Router>
      <Routes>
          <Route exact path="/"  element={<ProjectList/>} />
          <Route path="/create"  element={<ProjectCreate/>} />
          <Route path="/edit/:id"  element={<ProjectEdit/>} />
          <Route path="/show/:id"  element={<ProjectShow/>} />
      </Routes>
    </Router>
  );
}

export default App;
Let’s update the index.js file – We will add the axios base URL and add the API Key on the axios header.
src/index.js
import React from 'react';
import ReactDOM from 'react-dom/client';
import './index.css';
import 'bootstrap/dist/css/bootstrap.css';
import App from './App';
import reportWebVitals from './reportWebVitals';
import axios from 'axios';

const root = ReactDOM.createRoot(document.getElementById('root'));
axios.defaults.baseURL = process.env.REACT_APP_API_URL

root.render(
  <React.StrictMode>
    <App />
  </React.StrictMode>
);

// If you want to start measuring performance in your app, pass a function
// to log results (for example: reportWebVitals(console.log))
// or send to an analytics endpoint. Learn more: https://bit.ly/CRA-vitals
reportWebVitals();
Let’s create a new directory /src/components. Inside the directory, let’s create a file named Layout.js – this will serve as a template.
src/components/Layout.js
import React from 'react'

const Layout =({children}) =>{
    return(
        <div className="container">{children}</div>
    )
}

export default Layout;
We will now create a directory src/pages. Inside the folder let’s create these files for our pages:
- ProjectCreate.js
- ProjectEdit.js
- ProjectList.js
- ProjectShow.js
src/pages/ProjectCreate.js
import React, {useState} from 'react'
import { Link } from "react-router-dom"
import Swal from 'sweetalert2'
import axios from 'axios'
import Layout from "../components/Layout"


function ProjecCreate() {
    const [name, setName] = useState('');
    const [description, setDescription] = useState('')
    const [isSaving, setIsSaving] = useState(false)

    const handleSave = () => {
        setIsSaving(true);
        axios.post('/api/projects', {
            name: name,
            description: description
          })
          .then(function (response) {
            Swal.fire({
                icon: 'success',
                title: 'Project saved successfully!',
                showConfirmButton: false,
                timer: 1500
            })
            setIsSaving(false);
            setName('')
            setDescription('')
          })
          .catch(function (error) {
            Swal.fire({
                icon: 'error',
                title: 'An Error Occured!',
                showConfirmButton: false,
                timer: 1500
            })
            setIsSaving(false)
          });
    }

    return (
        <Layout>
            <div className="container">
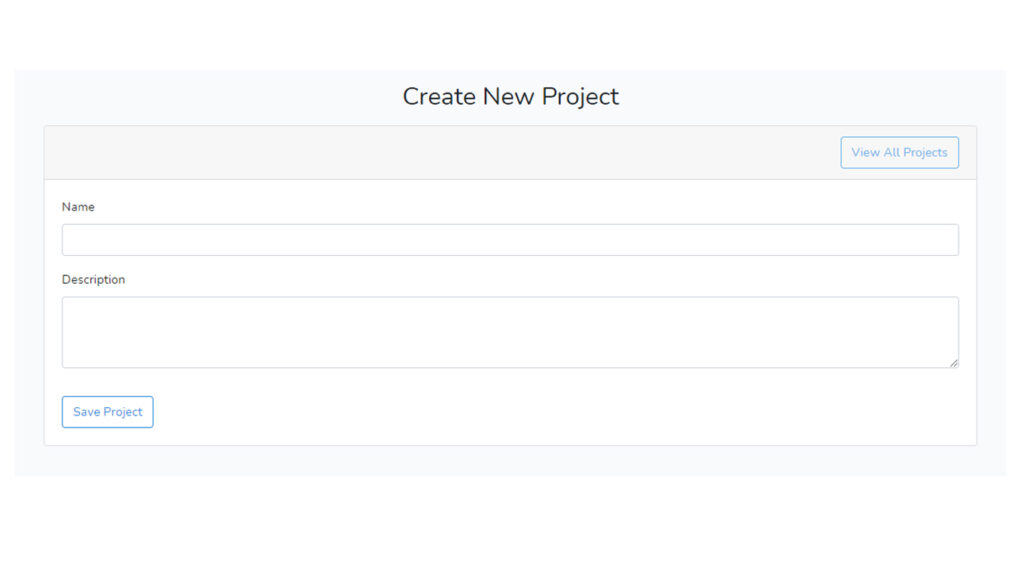
                <h2 className="text-center mt-5 mb-3">Create New Project</h2>
                <div className="card">
                    <div className="card-header">
                        <Link
                            className="btn btn-outline-info float-right"
                            to="/">View All Projects
                        </Link>
                    </div>
                    <div className="card-body">
                        <form>
                            <div className="form-group">
                                <label htmlFor="name">Name</label>
                                <input
                                    onChange={(event)=>{setName(event.target.value)}}
                                    value={name}
                                    type="text"
                                    className="form-control"
                                    id="name"
                                    name="name"/>
                            </div>
                            <div className="form-group">
                                <label htmlFor="description">Description</label>
                                <textarea
                                    value={description}
                                    onChange={(event)=>{setDescription(event.target.value)}}
                                    className="form-control"
                                    id="description"
                                    rows="3"
                                    name="description"></textarea>
                            </div>
                            <button
                                disabled={isSaving}
                                onClick={handleSave}
                                type="button"
                                className="btn btn-outline-primary mt-3">
                                Save Project
                            </button>
                        </form>
                    </div>
                </div>
            </div>
        </Layout>
    );
}

export default ProjecCreate;
src/pages/ProjectEdit.js
import React, { useState, useEffect } from 'react'
import { Link, useParams } from "react-router-dom"
import Swal from 'sweetalert2'
import axios from 'axios'
import Layout from "../components/Layout"

function ProjectEdit() {
    const [id, setId] = useState(useParams().id)
    const [name, setName] = useState('');
    const [description, setDescription] = useState('')
    const [isSaving, setIsSaving] = useState(false)


    useEffect(() => {
        axios.get(`/api/projects/${id}`)
        .then(function (response) {
            let project = response.data
            setName(project.name);
            setDescription(project.description);
        })
        .catch(function (error) {
            Swal.fire({
                 icon: 'error',
                title: 'An Error Occured!',
                showConfirmButton: false,
                timer: 1500
            })
        })

    }, [])


    const handleSave = () => {
        setIsSaving(true);
        axios.patch(`/api/projects/${id}`, {
            name: name,
            description: description
        })
        .then(function (response) {
            Swal.fire({
                icon: 'success',
                title: 'Project updated successfully!',
                showConfirmButton: false,
                timer: 1500
            })
            setIsSaving(false);
        })
        .catch(function (error) {
            Swal.fire({
                 icon: 'error',
                title: 'An Error Occured!',
                showConfirmButton: false,
                timer: 1500
            })
            setIsSaving(false)
        });
    }


    return (
        <Layout>
            <div className="container">
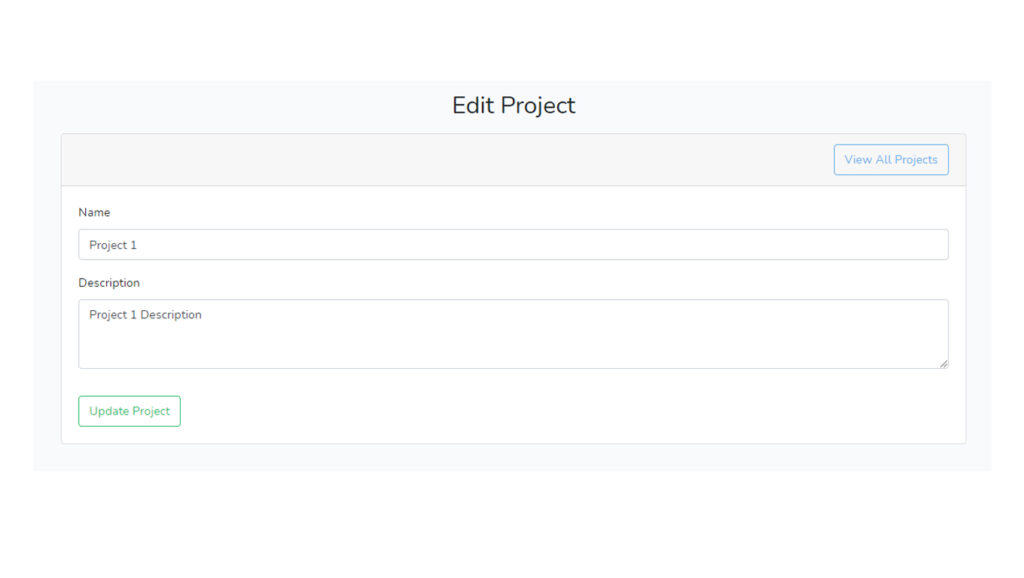
                <h2 className="text-center mt-5 mb-3">Edit Project</h2>
                <div className="card">
                    <div className="card-header">
                        <Link
                            className="btn btn-outline-info float-right"
                            to="/">View All Projects
                        </Link>
                    </div>
                    <div className="card-body">
                        <form>
                            <div className="form-group">
                                <label htmlFor="name">Name</label>
                                <input
                                    onChange={(event)=>{setName(event.target.value)}}
                                    value={name}
                                    type="text"
                                    className="form-control"
                                    id="name"
                                    name="name"/>
                            </div>
                            <div className="form-group">
                                <label htmlFor="description">Description</label>
                                <textarea
                                    value={description}
                                    onChange={(event)=>{setDescription(event.target.value)}}
                                    className="form-control"
                                    id="description"
                                    rows="3"
                                    name="description"></textarea>
                            </div>
                            <button
                                disabled={isSaving}
                                onClick={handleSave}
                                type="button"
                                className="btn btn-outline-success mt-3">
                                Update Project
                            </button>
                        </form>
                    </div>
                </div>
            </div>
        </Layout>
    );
}

export default ProjectEdit;
src/pages/ProjectList.js.
import React,{ useState, useEffect} from 'react'
import { Link } from "react-router-dom"
import Swal from 'sweetalert2'
import axios from 'axios'
import Layout from "../components/Layout"


function ProjectList() {
    const  [projectList, setProjectList] = useState([])

    useEffect(() => {
        fetchProjectList()
    }, [])

    const fetchProjectList = () => {
        axios.get('/api/projects')
        .then(function (response) {
          setProjectList(response.data);
        })
        .catch(function (error) {
          console.log(error);
        })
    }

    const handleDelete = (id) => {
        Swal.fire({
            title: 'Are you sure?',
            text: "You won't be able to revert this!",
            icon: 'warning',
            showCancelButton: true,
            confirmButtonColor: '#3085d6',
            cancelButtonColor: '#d33',
            confirmButtonText: 'Yes, delete it!'
          }).then((result) => {
            if (result.isConfirmed) {
                axios.delete(`/api/projects/${id}`)
                .then(function (response) {
                    Swal.fire({
                        icon: 'success',
                        title: 'Project deleted successfully!',
                        showConfirmButton: false,
                        timer: 1500
                    })
                    fetchProjectList()
                })
                .catch(function (error) {
                    Swal.fire({
                         icon: 'error',
                        title: 'An Error Occured!',
                        showConfirmButton: false,
                        timer: 1500
                    })
                });
            }
          })
    }

    return (
        <Layout>
           <div className="container">
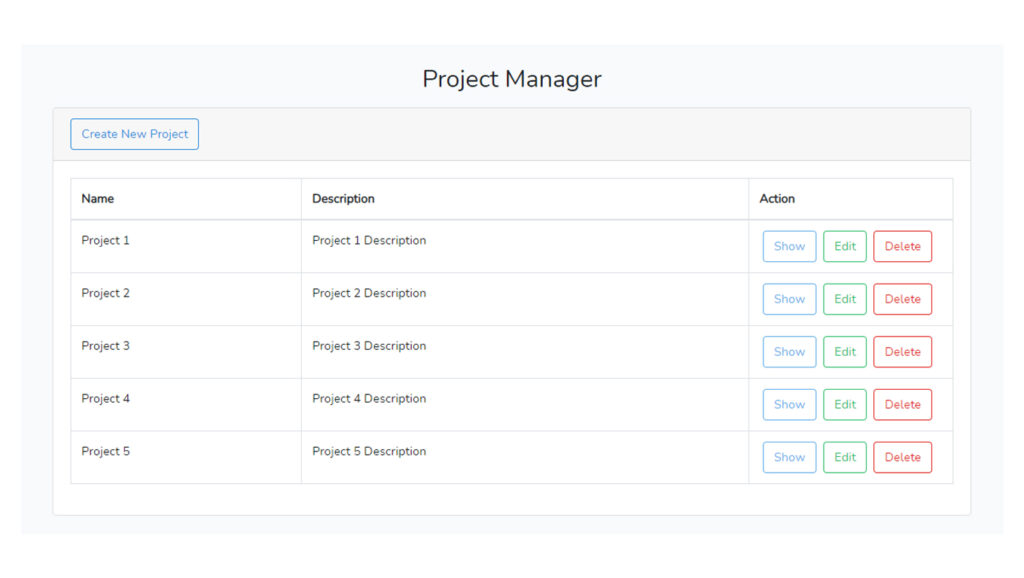
            <h2 className="text-center mt-5 mb-3">Project Manager</h2>
                <div className="card">
                    <div className="card-header">
                        <Link
                            className="btn btn-outline-primary"
                            to="/create">Create New Project
                        </Link>
                    </div>
                    <div className="card-body">

                        <table className="table table-bordered">
                            <thead>
                                <tr>
                                    <th>Name</th>
                                    <th>Description</th>
                                    <th width="240px">Action</th>
                                </tr>
                            </thead>
                            <tbody>
                                {projectList.map((project, key)=>{
                                    return (
                                        <tr key={key}>
                                            <td>{project.name}</td>
                                            <td>{project.description}</td>
                                            <td>
                                                <Link
                                                    to={`/show/${project._id}`}
                                                    className="btn btn-outline-info mx-1">
                                                    Show
                                                </Link>
                                                <Link
                                                    className="btn btn-outline-success mx-1"
                                                    to={`/edit/${project._id}`}>
                                                    Edit
                                                </Link>
                                                <button
                                                    onClick={()=>handleDelete(project._id)}
                                                    className="btn btn-outline-danger mx-1">
                                                    Delete
                                                </button>
                                            </td>
                                        </tr>
                                    )
                                })}
                            </tbody>
                        </table>
                    </div>
                </div>
            </div>
        </Layout>
    );
}

export default ProjectList;
src/pages/ProjectShow.js
import React, {useState, useEffect} from 'react';
import { Link, useParams } from "react-router-dom";
import axios from 'axios';
import Layout from "../components/Layout"


function ProjectShow() {
    const [id, setId] = useState(useParams().id)
    const [project, setProject] = useState({name:'', description:''})

    useEffect(() => {
        axios.get(`/api/projects/${id}`)
        .then(function (response) {
          setProject(response.data)
        })
        .catch(function (error) {
          console.log(error);
        })
    }, [])

    return (
        <Layout>
           <div className="container">
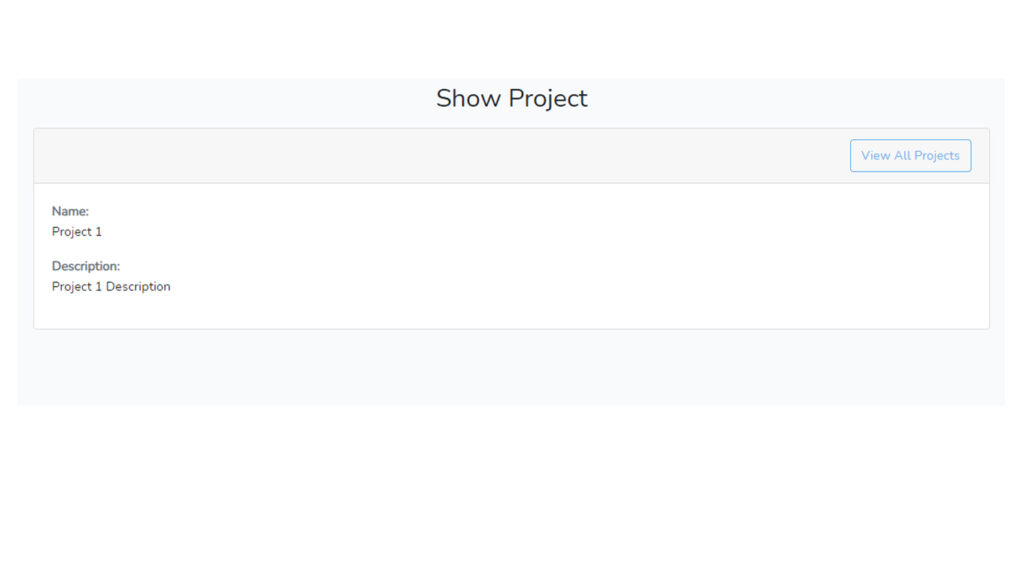
            <h2 className="text-center mt-5 mb-3">Show Project</h2>
                <div className="card">
                    <div className="card-header">
                        <Link
                            className="btn btn-outline-info float-right"
                            to="/"> View All Projects
                        </Link>
                    </div>
                    <div className="card-body">
                        <b className="text-muted">Name:</b>
                        <p>{project.name}</p>
                        <b className="text-muted">Description:</b>
                        <p>{project.description}</p>
                    </div>
                </div>
            </div>
        </Layout>
    );
}

export default ProjectShow;
Step 5: Run the app
We’re all done, what is left is to run the app.
npm start
Open this URL:
http://localhost:3000
Screenshots:
Index Page
Create Page
Edit Page
Show Page
