Contents
Hi! Today we will learn how to create an authentication on our CodeIgniter API. But before that let’s have a discussion about API and what is JSON Web Token(JWT).
API stands for Application Program Interface, API is an interface that allows applications to exchange data. To make it more clear, API are set of functions that can be used by programmer to build software and applications.
JWT stands for JSON Web Token, it is an open standard (RFC 7519) that defines a compact and self-contained way for securely transmitting information between parties as a JSON object. JWT is commonly used for Authorization, Information Exchange and etc.
Now that we have a glimpse of the idea on the topic, We will now proceed with building the app.
Tutorial Video:
Step 1: Install CodeIgniter 4
For us to install CodeIgniter 4 we can install via composer or directly download CodeIgniter 4 here:
Install via composer:
composer create-project codeigniter4/appstarter ci-4-jwt
Step 2: Change CodeIgniter Environment
The default environment of CodeIgniter is production, it is a safety feature to add security in case settings are messed up when it goes live. For us to change the environment we will rename or copy the file env to .env. Once it is renamed, open the file and uncomment and change the CI_ENVIRONMENT value from production to development.
.env
CI_ENVIRONMENT = development
Step 3: Configure Database
After setting up the environment, we will then configure our database. You can configure it on .env or on the config file located at app/Config/Database.php. For this tutorial, we will configure it on app/Config/Database.php.
Configure the database connection values:
app/Config/Database.php.
<?php

namespace Config;

use CodeIgniter\Database\Config;

/**
 * Database Configuration
 */
class Database extends Config
{
    /**
     * The directory that holds the Migrations
     * and Seeds directories.
     *
     * @var string
     */
    public $filesPath = APPPATH . 'Database' . DIRECTORY_SEPARATOR;

    /**
     * Lets you choose which connection group to
     * use if no other is specified.
     *
     * @var string
     */
    public $defaultGroup = 'default';

    /**
     * The default database connection.
     *
     * @var array
     */
    public $default = [
        'DSN'      => '',
        'hostname' => 'localhost',
        'username' => 'root',
        'password' => '',
        'database' => 'ci_4_jwt',
        'DBDriver' => 'MySQLi',
        'DBPrefix' => '',
        'pConnect' => false,
        'DBDebug'  => (ENVIRONMENT !== 'production'),
        'charset'  => 'utf8',
        'DBCollat' => 'utf8_general_ci',
        'swapPre'  => '',
        'encrypt'  => false,
        'compress' => false,
        'strictOn' => false,
        'failover' => [],
        'port'     => 3306,
    ];

    /**
     * This database connection is used when
     * running PHPUnit database tests.
     *
     * @var array
     */
    public $tests = [
        'DSN'      => '',
        'hostname' => '127.0.0.1',
        'username' => '',
        'password' => '',
        'database' => ':memory:',
        'DBDriver' => 'SQLite3',
        'DBPrefix' => 'db_',  // Needed to ensure we're working correctly with prefixes live. DO NOT REMOVE FOR CI DEVS
        'pConnect' => false,
        'DBDebug'  => (ENVIRONMENT !== 'production'),
        'charset'  => 'utf8',
        'DBCollat' => 'utf8_general_ci',
        'swapPre'  => '',
        'encrypt'  => false,
        'compress' => false,
        'strictOn' => false,
        'failover' => [],
        'port'     => 3306,
    ];

    //--------------------------------------------------------------------

    public function __construct()
    {
        parent::__construct();

        // Ensure that we always set the database group to 'tests' if
        // we are currently running an automated test suite, so that
        // we don't overwrite live data on accident.
        if (ENVIRONMENT === 'testing')
        {
            $this->defaultGroup = 'tests';
        }
    }

    //--------------------------------------------------------------------

}
Step 4: Create A Model and Migration
Model – it a class that represents a database table.
Migration – like version control for the database that allows us to modify and share database schema to your team.
Execute this command on the Terminal or CMD to create a model:
php spark make:model UserModel
open the created model at app/Models/UserModel.php. Inside the file you can see configuration options, you can read the documentation to further learn about its configuration options. We will now update the configs:
app/Models/UserModel.php
<?php

namespace App\Models;

use CodeIgniter\Model;

class UserModel extends Model
{
    protected $DBGroup              = 'default';
    protected $table                = 'users';
    protected $primaryKey           = 'id';
    protected $useAutoIncrement     = true;
    protected $insertID             = 0;
    protected $returnType           = 'array';
    protected $useSoftDeletes       = false;
    protected $protectFields        = true;
    protected $allowedFields        = ['email', 'password'];

    // Dates
    protected $useTimestamps        = true;
    protected $dateFormat           = 'datetime';
    protected $createdField         = 'created_at';
    protected $updatedField         = 'updated_at';
    protected $deletedField         = 'deleted_at';

    // Validation
    protected $validationRules      = [];
    protected $validationMessages   = [];
    protected $skipValidation       = false;
    protected $cleanValidationRules = true;

    // Callbacks
    protected $allowCallbacks       = true;
    protected $beforeInsert         = [];
    protected $afterInsert          = [];
    protected $beforeUpdate         = [];
    protected $afterUpdate          = [];
    protected $beforeFind           = [];
    protected $afterFind            = [];
    protected $beforeDelete         = [];
    protected $afterDelete          = [];
}
After creating the model, we will then create a migration file.
Execute this command on the Terminal or CMD to create a migration:
php spark make:migration AddUser
Open the created migration file on app/Database/Migrations/ and paste these codes:
<?php

namespace App\Database\Migrations;

use CodeIgniter\Database\Migration;

class AddUser extends Migration
{
    public function up()
    {
        $this->forge->addField([
            'id' => [
'type' => 'BIGINT',
'constraint' => 255,
'unsigned' => true,
'auto_increment' => true
            ],
            'email' => [
'type' => 'VARCHAR',
'unique' => true,
'constraint' => '255',
            ],
            'password' => [
'type' => 'VARCHAR',
'constraint' => '255',
            ],
            'created_at' => [
'type' => 'TIMESTAMP',
'null' => true
            ],
            'updated_at' => [
'type' => 'TIMESTAMP',
'null' => true
            ],
        ]);
        $this->forge->addPrimaryKey('id');
        $this->forge->createTable('users');
    }

    public function down()
    {
        $this->forge->dropTable('users');
    }
}
Run the migration by executing the migrate command:
php spark migrate
Step 5: Install JWT Package
We will then install the jwt package using composer:
composer require firebase/php-jwt
After installing the jwt package, add JWT_SECRET on the .env file
.env
#--------------------------------------------------------------------
# JWT
#--------------------------------------------------------------------
JWT_SECRET = 'JWT SECRET KEY SAMPLE HERE'
Step 6: Create Controllers
A Controller is the one responsible for receiving Request and returning Response.
Execute this command on the Terminal or CMD to create a the Controllers:
php spark make:controller Login
php spark make:controller Register
php spark make:controller User
After executing the command, it will create files located at app/Controllers. Open those file and insert these codes:
app/Controllers/Login.php
<?php

namespace App\Controllers;

use App\Controllers\BaseController;
use CodeIgniter\API\ResponseTrait;
use App\Models\UserModel;
use \Firebase\JWT\JWT;

class Login extends BaseController
{
    use ResponseTrait;

    public function index()
    {
        $userModel = new UserModel();

        $email = $this->request->getVar('email');
        $password = $this->request->getVar('password');

        $user = $userModel->where('email', $email)->first();

        if(is_null($user)) {
            return $this->respond(['error' => 'Invalid username or password.'], 401);
        }

        $pwd_verify = password_verify($password, $user['password']);

        if(!$pwd_verify) {
            return $this->respond(['error' => 'Invalid username or password.'], 401);
        }

        $key = getenv('JWT_SECRET');
        $iat = time(); // current timestamp value
        $exp = $iat + 3600;

        $payload = array(
            "iss" => "Issuer of the JWT",
            "aud" => "Audience that the JWT",
            "sub" => "Subject of the JWT",
            "iat" => $iat, //Time the JWT issued at
            "exp" => $exp, // Expiration time of token
            "email" => $user['email'],
        );

        $token = JWT::encode($payload, $key, 'HS256');

        $response = [
            'message' => 'Login Succesful',
            'token' => $token
        ];

        return $this->respond($response, 200);
    }

}
app/Controllers/Register.php
<?php

namespace App\Controllers;

use App\Controllers\BaseController;
use CodeIgniter\API\ResponseTrait;
use App\Models\UserModel;


class Register extends BaseController
{
	use ResponseTrait;

	public function index()
	{
		$rules = [
            'email' => ['rules' => 'required|min_length[4]|max_length[255]|valid_email|is_unique[users.email]'],
            'password' => ['rules' => 'required|min_length[8]|max_length[255]'],
            'confirm_password'  => [ 'label' => 'confirm password', 'rules' => 'matches[password]']
        ];


        if($this->validate($rules)){
            $model = new UserModel();
            $data = [
                'email'    => $this->request->getVar('email'),
                'password' => password_hash($this->request->getVar('password'), PASSWORD_DEFAULT)
            ];
            $model->save($data);

			return $this->respond(['message' => 'Registered Successfully'], 200);
        }else{
            $response = [
				'errors' => $this->validator->getErrors(),
				'message' => 'Invalid Inputs'
			];
			return $this->fail($response , 409);

        }

	}
}
app/Controllers/User.php
<?php

namespace App\Controllers;

use App\Controllers\BaseController;
use CodeIgniter\API\ResponseTrait;
use App\Models\UserModel;

class User extends BaseController
{
	use ResponseTrait;

	public function index()
	{
		$users = new UserModel;
		return $this->respond(['users' => $users->findAll()], 200);
	}
}
Step 7: Create Controller Filter
Controller Filters are classes that allows us to perform actions before or after the controllers execute.
We will now create Filter that will be used to check if a request is allowed and has authorization. Execute this command on the Terminal or CMD:
php spark make:filter AuthFilter
After executing the command, it will create file located at app/Filters. Open this file and insert these codes:
app/Filters/AuthFilter.php
<?php

namespace App\Filters;

use CodeIgniter\Filters\FilterInterface;
use CodeIgniter\HTTP\RequestInterface;
use CodeIgniter\HTTP\ResponseInterface;
use Firebase\JWT\JWT;
use Firebase\JWT\Key;

class AuthFilter implements FilterInterface
{
    /**
     * Do whatever processing this filter needs to do.
     * By default it should not return anything during
     * normal execution. However, when an abnormal state
     * is found, it should return an instance of
     * CodeIgniter\HTTP\Response. If it does, script
     * execution will end and that Response will be
     * sent back to the client, allowing for error pages,
     * redirects, etc.
     *
     * @param RequestInterface $request
     * @param array|null       $arguments
     *
     * @return mixed
     */
    public function before(RequestInterface $request, $arguments = null)
    {
        $key = getenv('JWT_SECRET');
        $header = $request->getHeader("Authorization");
        $token = null;

        // extract the token from the header
        if(!empty($header)) {
            if (preg_match('/Bearer\s(\S+)/', $header, $matches)) {
                $token = $matches[1];
            }
        }

        // check if token is null or empty
        if(is_null($token) || empty($token)) {
            $response = service('response');
            $response->setBody('Access denied');
            $response->setStatusCode(401);
            return $response;
        }

        try {
            // $decoded = JWT::decode($token, $key, array("HS256"));
            $decoded = JWT::decode($token, new Key($key, 'HS256'));
        } catch (\Exception $ex) {
            $response = service('response');
            $response->setBody('Access denied');
            $response->setStatusCode(401);
            return $response;
        }
    }

    /**
     * Allows After filters to inspect and modify the response
     * object as needed. This method does not allow any way
     * to stop execution of other after filters, short of
     * throwing an Exception or Error.
     *
     * @param RequestInterface  $request
     * @param ResponseInterface $response
     * @param array|null        $arguments
     *
     * @return mixed
     */
    public function after(RequestInterface $request, ResponseInterface $response, $arguments = null)
    {
        //
    }
}
After creating the filter, we must add it to filters config located at app/Config/Filters.php. We will creating an alias for our filter.
app/Config/Filters.php
<?php

namespace Config;

use CodeIgniter\Config\BaseConfig;
use CodeIgniter\Filters\CSRF;
use CodeIgniter\Filters\DebugToolbar;
use CodeIgniter\Filters\Honeypot;

class Filters extends BaseConfig
{
	/**
	 * Configures aliases for Filter classes to
	 * make reading things nicer and simpler.
	 *
	 * @var array
	 */
	public $aliases = [
		'csrf'     => CSRF::class,
		'toolbar'  => DebugToolbar::class,
		'honeypot' => Honeypot::class,
		'authFilter' => \App\Filters\AuthFilter::class,
	];

	/**
	 * List of filter aliases that are always
	 * applied before and after every request.
	 *
	 * @var array
	 */
	public $globals = [
		'before' => [
			// 'honeypot',
			// 'csrf',
		],
		'after'  => [
			'toolbar',
			// 'honeypot',
		],
	];

	/**
	 * List of filter aliases that works on a
	 * particular HTTP method (GET, POST, etc.).
	 *
	 * Example:
	 * 'post' => ['csrf', 'throttle']
	 *
	 * @var array
	 */
	public $methods = [];

	/**
	 * List of filter aliases that should run on any
	 * before or after URI patterns.
	 *
	 * Example:
	 * 'isLoggedIn' => ['before' => ['account/*', 'profiles/*']]
	 *
	 * @var array
	 */
	public $filters = [];
}
Step 8: Register Routes
Open the config file for routing located at app/Config/Routes.php and register these routes:
app/Config/Routes.php
$routes->group("api", function ($routes) {
    $routes->post("register", "Register::index");
    $routes->post("login", "Login::index");
    $routes->get("users", "User::index", ['filter' => 'authFilter']);
});
Step 9: Run the Application
Now that we have completed the steps above we will now run the app. To run the app, execute this command:
php spark serve
Screenshots:
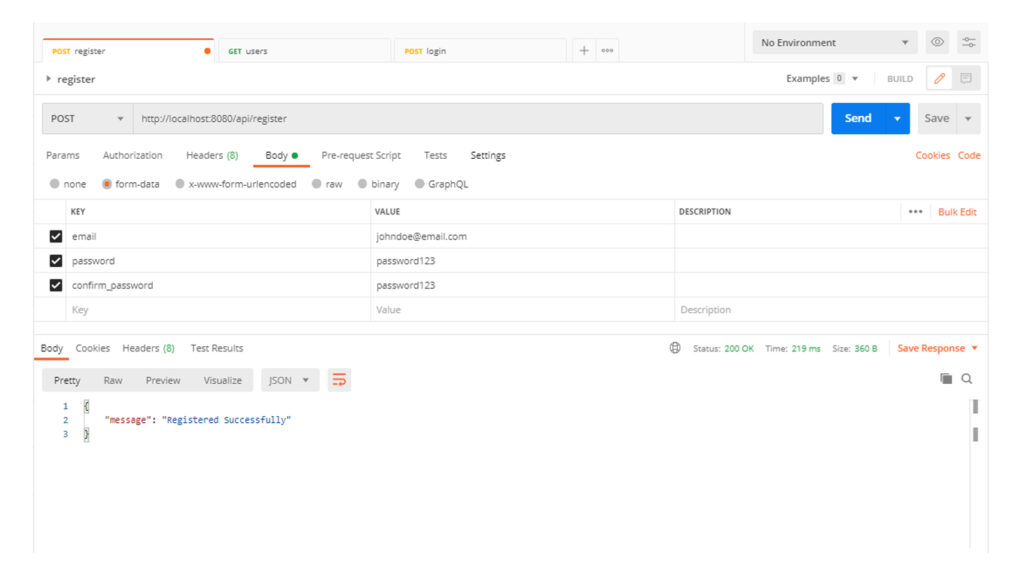
/api/register (This route will be used for registering new users)

/api/login (This route will be used for login and for getting the bearer token)

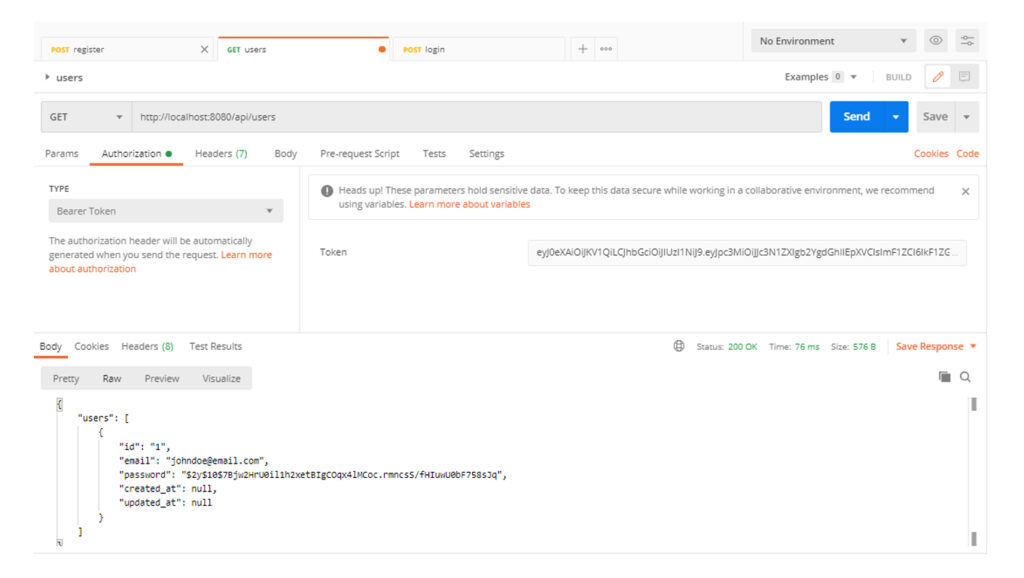
/api/users (this a protected route for getting list of users), add the token on the Bearer Token:


