Contents
- Introduction:
- Prerequisite:
- Step 1: Install Laravel 10 Using Composer
- Step 2: Install Laravel Passport
- Step 3: Set Database Configuration
- Step 4: Execute Migration
- Step 5: Create Encryption Keys
- Step 6: Update User Model
- Step 7: Update AuthServiceProvider
- Step 8: Set API Driver Option
- Step 9: Create an Authentication Controller
- Step 10: Create API routes
- Let’s test the API Authentication
Introduction:
Hi! Today we will learn how to create an authentication on our Laravel 10 API. But before that let has a discussion about API and what is Laravel Passport.
API stands for Application Program Interface, API is an interface that allows applications to exchange data. To make it more clear, APIs are a set of functions that can be used by programmers to build software and applications.
Since our API is stateless and doesn’t have a session we will be using the Laravel Passport. It is an Oauth2 server that will be used for API authentication.
Prerequisite:
- Composer
- MySQL
- PHP >= 8.1
Step 1: Install Laravel 10 Using Composer
First, select a folder where you want Laravel to be installed then execute this command on Terminal or CMD to install Laravel 10:
composer create-project laravel/laravel:^10.0 laravel-10-passport
Install via Laravel Installer:
laravel new laravel-10-passport
Step 2: Install Laravel Passport
Move to the created laravel up and install the Laravel Passport. Execute this command to install Passport:
composer require laravel/passport
Step 3: Set Database Configuration
Open the .env file and set the database configuration:
.env
DB_CONNECTION=mysql
DB_HOST=127.0.0.1
DB_PORT=3306
DB_DATABASE=your database name(laravel_10_passport)
DB_USERNAME=your database username(root)
DB_PASSWORD=your database password(root)
Step 4: Execute Migration
The Laravel passport has its database migrations directory. The passport migration will create tables to store clients and access tokens.
Run the migration by executing the migrate Artisan command:
php artisan migrate
Step 5: Create Encryption Keys
Let’s create the encryption keys for generating secure access tokens. Run this command:
php artisan passport:install
The command will create personal access and password grants to be used in generating access tokens.
Step 6: Update User Model
after successfully running passport:install, Add the Laravel\Passport\HasApiTokens trait to the App\Modles\User model. The trait provides helper methods for the model to inspect the authenticated user’s token and scopes.
app\Models\User.php
<?php

namespace App\Models;

use Illuminate\Contracts\Auth\MustVerifyEmail;
use Illuminate\Database\Eloquent\Factories\HasFactory;
use Illuminate\Foundation\Auth\User as Authenticatable;
use Illuminate\Notifications\Notifiable;
use Laravel\Passport\HasApiTokens;

class User extends Authenticatable
{
    use HasApiTokens, HasFactory, Notifiable;

    /**
     * The attributes that are mass assignable.
     *
     * @var array
     */
    protected $fillable = [
        'name',
        'email',
        'password',
    ];

    /**
     * The attributes that should be hidden for arrays.
     *
     * @var array
     */
    protected $hidden = [
        'password',
        'remember_token',
    ];

    /**
     * The attributes that should be cast to native types.
     *
     * @var array
     */
    protected $casts = [
        'email_verified_at' => 'datetime',
    ];
}
Step 7: Update AuthServiceProvider
Add Passport:routes method in AuthServiceProvider boot method. This method will handle the registration of necessary routes to issue and revoke access tokens, clients, and personal access tokens.
app/Providers/AuthServiceProvider.php
<?php

namespace App\Providers;

use Illuminate\Foundation\Support\Providers\AuthServiceProvider as ServiceProvider;
use Illuminate\Support\Facades\Gate;
use Laravel\Passport\Passport;

class AuthServiceProvider extends ServiceProvider
{
    /**
     * The policy mappings for the application.
     *
     * @var array
     */
    protected $policies = [
        // 'App\Models\Model' => 'App\Policies\ModelPolicy',
    ];

    /**
     * Register any authentication / authorization services.
     *
     * @return void
     */
    public function boot()
    {
        $this->registerPolicies();

        if (! $this->app->routesAreCached()) {
            Passport::routes();
        }
    }
}
Step 8: Set API Driver Option
Set to passport the driver option of API authentication guard. The the incoming API request will be authenticated by Passport’s TokenGuard.
config/auth.php
  'guards' => [
        'web' => [
            'driver' => 'session',
            'provider' => 'users',
        ],

        'api' => [
            'driver' => 'passport',
            'provider' => 'users',
        ],
    ],
Step 9: Create an Authentication Controller
Now, Let’s create a controller that will be responsible for registering and authenticating users. Run this command:
php artisan make:controller Api/AuthenticationController
then open the AuthenticationController file, and add these codes:
app/Http/Controllers/Api/AuthenticationController.php
<?php
namespace App\Http\Controllers\API;

use App\Http\Controllers\Controller;
use Illuminate\Http\Request;
use Illuminate\Support\Facades\Auth;
use App\Models\User;


class AuthenticationController extends Controller
{
    public function register(Request $request)
    {
        $formData = [
            'name' => $request->name,
            'email' => $request->email,
            'password' => $request->password,
        ];

        $formData['password'] = bcrypt($request->password);

        $user = User::create($formData);

        return response()->json([
            'user' => $user,
            'token' => $user->createToken('passportToken')->accessToken
        ], 200);

    }

    public function login(Request $request)
    {
        $credentials = [
            'email'    => $request->email,
            'password' => $request->password
        ];

        if (Auth::attempt($credentials))
        {
            $token = Auth::user()->createToken('passportToken')->accessToken;

            return response()->json([
                'user' => Auth::user(),
                'token' => $token
            ], 200);
        }

        return response()->json([
            'error' => 'Unauthorised'
        ], 401);

    }
}
Step 10: Create API routes
Finally, let’s create a route for the user to register and login.
routes/api.php
<?php

use Illuminate\Http\Request;
use Illuminate\Support\Facades\Route;
use App\Http\Controllers\Api\AuthenticationController;

/*
|--------------------------------------------------------------------------
| API Routes
|--------------------------------------------------------------------------
|
| Here is where you can register API routes for your application. These
| routes are loaded by the RouteServiceProvider within a group which
| is assigned the "api" middleware group. Enjoy building your API!
|
*/

Route::post('register', [AuthenticationController::class, 'register'])->name('register');
Route::post('login', [AuthenticationController::class, 'login'])->name('login');

Route::middleware('auth:api')->get('/user', function (Request $request) {
    return $request->user();
});
Let’s test the API Authentication
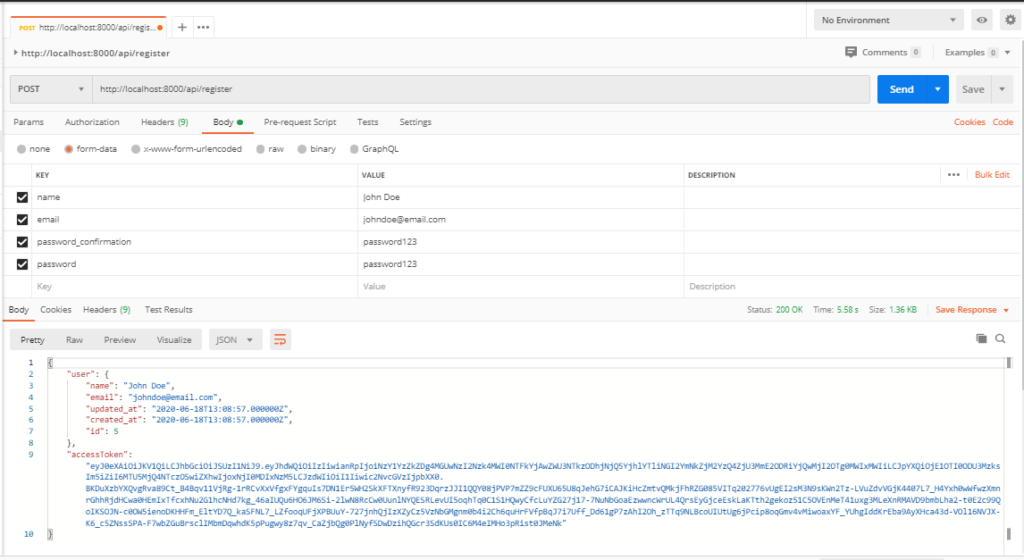
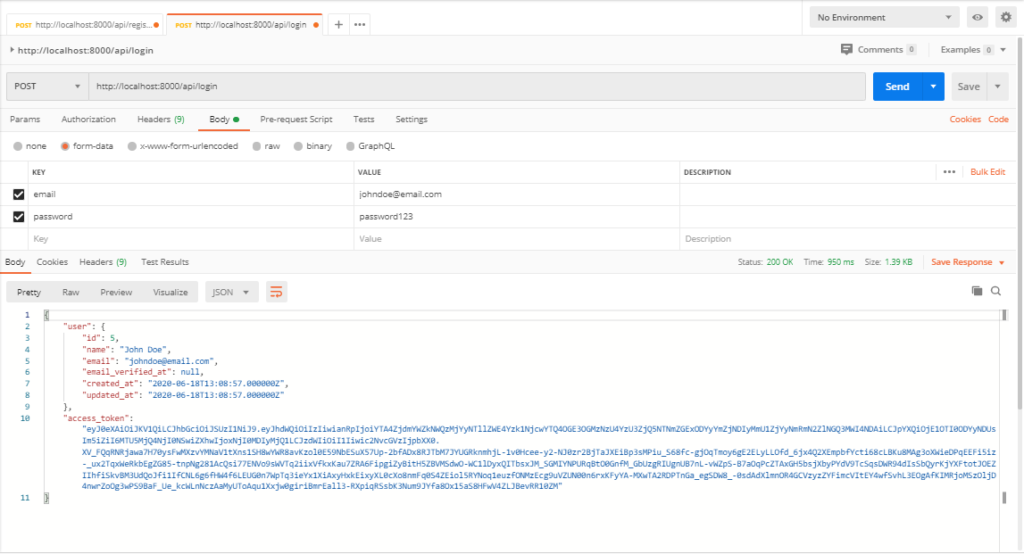
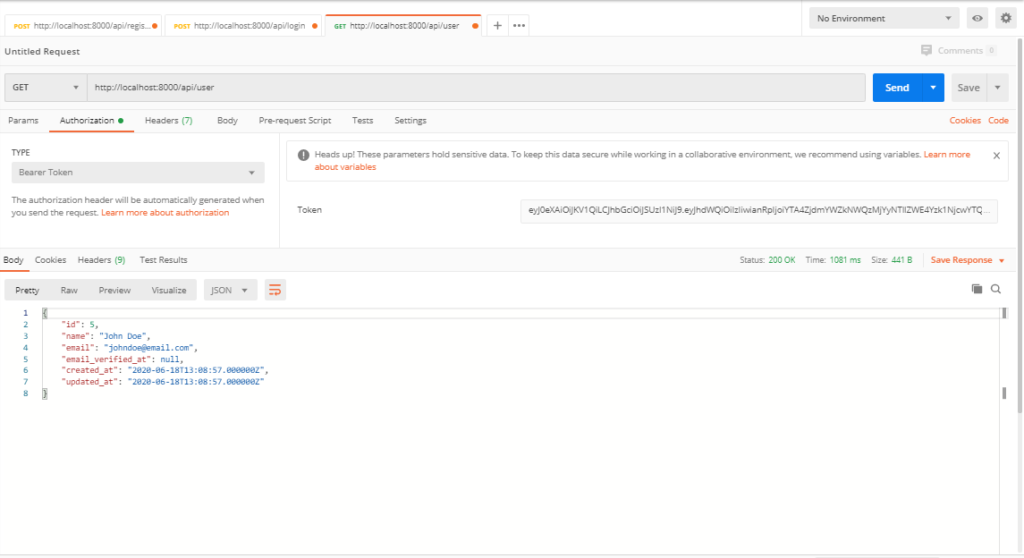
We will be using Postman for our testing, but you can test it on the way you prefer.
Register

Login

The access token will be used when accessing an API route that needs authentication. Try accessing the /api/user route.

Now our API authentication is done.


